




















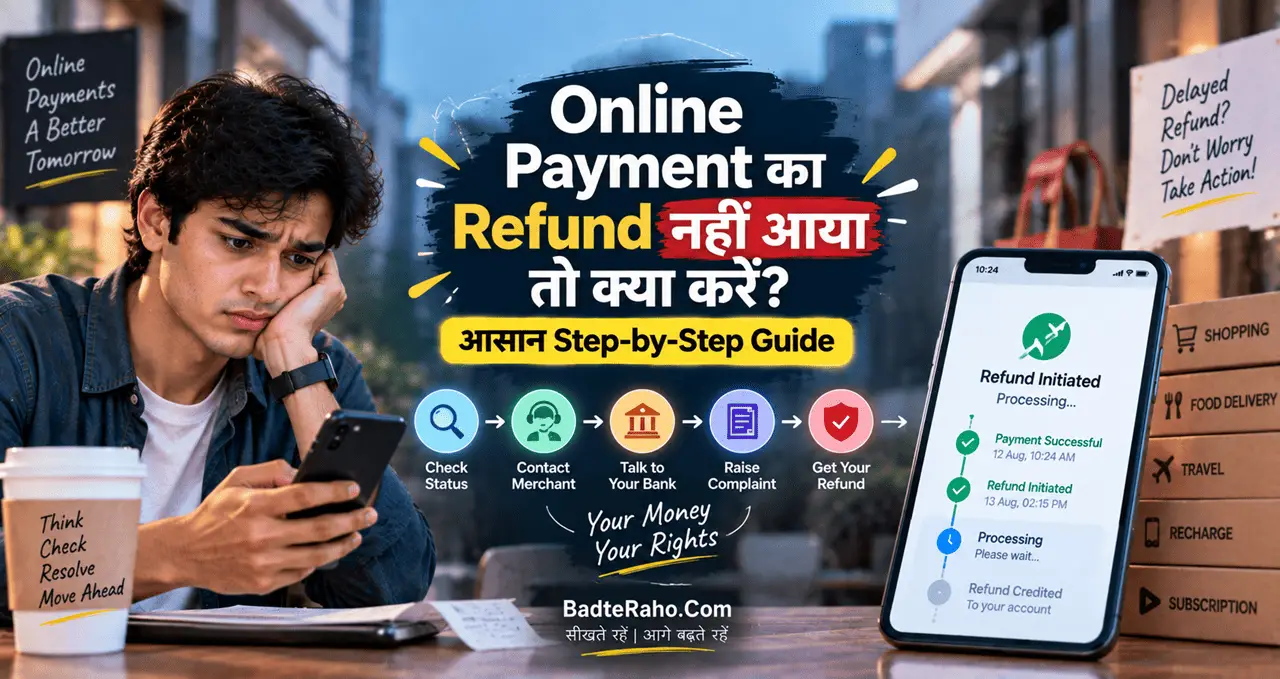
Online shopping का order cancel किया। App में कुछ देर बाद message भी आ गया—“Refund initiated.”
लेकिन bank account में पैसे दिखाई नहीं दे रहे हैं।
अब सवाल शुरू होते हैं—क्या merchant ने सच में refund भेजा? Bank में processing चल रही है? UPI या card transaction अटक गया? या अभी सिर्फ wait करना चाहिए?
सबसे important बात यह है कि merchant refund और failed transaction एक ही चीज़ नहीं हैं। दोनों में पैसे वापस आने का process अलग हो सकता है।
अब समझते हैं कि refund नहीं आने पर पहले क्या check करना चाहिए और complaint किस क्रम में करनी है।
इस लेख में आप क्या सीखेंगे?
- Refund delay के कारण
- Transaction status की जाँच
- Merchant से सही follow-up
- Bank complaint का तरीका
- UPI refund की स्थिति
- Card refund का process
- Complaint escalation का रास्ता
पहले पहचानें: Refund है या Failed Transaction?
यहीं से पूरा process तय होता है।
मान लीजिए आपने किसी shopping website पर ₹3,000 की payment की। Payment successful हुई, order confirm हुआ और बाद में आपने उसे cancel कर दिया।
Merchant ने cancellation accept की और refund initiate किया।
यह merchant refund है।
अब दूसरी situation देखें।
आपने ₹3,000 pay किए, account से पैसे कट गए, लेकिन merchant को payment confirmation नहीं मिला और order भी place नहीं हुआ।
यह failed transaction हो सकती है।
RBI के failed-transaction framework में ऐसे specific cases के लिए auto-reversal timelines दी गई हैं जहाँ transaction customer की गलती के बिना पूरी नहीं हो पाती।
यानी सिर्फ account से पैसा debit हो जाना काफी information नहीं है।
सबसे पहले यह clear करें:
Payment successful थी और बाद में refund होना है, या transaction शुरुआत में ही fail हो गई थी?
अगर आपको UPI, card और wallet जैसे payment methods का basic difference समझना है, तो Digital Payment क्या है? UPI, Wallet और Card में क्या अंतर है? भी useful रहेगा।
Refund और Reversal में क्या फर्क है?
Simple language में:
Refund: merchant को payment मिल गई थी, बाद में वह amount वापस कर रहा है।
Reversal: transaction सही तरीके से complete नहीं हुई और debit amount वापस किया जा रहा है।
इसीलिए दोनों के लिए एक ही timeline assume नहीं करनी चाहिए।
Refund नहीं आया तो पहले क्या करें?
Customer care पर complaint करने से पहले कुछ basic checks कर लेना resolution को काफी आसान बना देता है।
1. Original Transaction खोलकर देखें
App, UPI history, card statement या bank account में original payment check करें।
देखें:
- Transaction successful थी या failed?
- Amount कितना था?
- Payment किस method से हुई?
- Transaction ID क्या है?
- किस bank account या card से payment हुई?
कई बार refund user के दूसरे linked account या credit card में वापस जाता है और वह savings account में उसे ढूँढ रहा होता है।
इसलिए original payment method confirm करना ज़रूरी है।
2. सिर्फ Order Cancellation न देखें
Order cancelled होना और refund initiate होना अलग stages हो सकते हैं।
Merchant के app, website, email या SMS में देखें:
Refund initiated लिखा है या नहीं?
Refund amount कितना है?
किस date को refund initiate हुआ?
Expected processing time क्या है?
कोई refund reference दिया गया है?
अगर सिर्फ “Order Cancelled” दिख रहा है, तो यह assume न करें कि refund उसी समय banking system में भेज दिया गया।
3. Bank Statement भी Check करें
सिर्फ SMS notification पर depend न रहें।
Mobile banking या official bank statement खोलकर credit entries देखें।
Credit card payment थी तो card transaction history और current statement भी check करें। Refund card account में adjustment के रूप में दिखाई दे सकता है।
4. Merchant की Timeline Note करें
Merchant ने अगर कहा है कि refund 3, 5 या 7 business days में दिखाई देगा, तो उस timeline को note करें।
लेकिन सिर्फ याद रखने के बजाय screenshot ले लें।
अगर promised period निकल जाता है, तो आपके पास follow-up के लिए clear date होगी।
Merchant से क्या पूछना चाहिए?
Refund delay में merchant से सिर्फ:
“मेरे पैसे कब आएँगे?”
पूछना बहुत useful नहीं होता।
Specific details माँगें।
आप ऐसा message भेज सकते हैं:
मेरा refund अभी तक original payment method में credit नहीं हुआ है। कृपया refund initiation date, refund amount और available refund/reference number share करें ताकि मैं इसे अपने bank या payment provider के साथ trace कर सकूँ।
इसमें सबसे important चीज़ है refund reference।
Reference number का exact नाम merchant या payment processor के हिसाब से अलग हो सकता है, लेकिन अगर merchant कोई traceable refund ID देता है तो उसे save करें।
Merchant email, chat screenshot और refund confirmation भी संभालकर रखें।
UPI Refund नहीं आया तो क्या करें?
UPI में दो situations सबसे ज़्यादा confuse करती हैं।
UPI Transfer Failed हुआ
आपका account debit हुआ, लेकिन beneficiary को पैसा credit नहीं हुआ।
RBI framework के अनुसार UPI fund transfer में beneficiary account credit न होने पर auto-reversal latest T+1 day तक होना चाहिए। Prescribed timeline से delay होने पर ₹100 per day compensation framework भी दिया गया है।
NPCI का UPI Help system भी debit transactions में complaint/status checking support करता है; person-to-person successful transactions इसके सामान्य complaint scope से अलग रखे गए हैं।
Merchant Payment Failed हुई
मान लीजिए आपने UPI से दुकान या online merchant को payment की।
Account debit हो गया, लेकिन merchant को transaction confirmation नहीं मिला।
RBI framework में इस scenario के लिए auto-reversal T+5 days तक prescribed है, और delay beyond prescribed TAT पर ₹100 per day compensation का framework है।
Payment Successful थी, फिर Order Cancel हुआ
यह अलग case है।
यह normal failed UPI transaction नहीं है।
यह merchant refund है और आपको merchant की refund processing details तथा अपने bank/payment provider के साथ follow-up करना चाहिए।
यही distinction article का सबसे important point है।
हर UPI refund पर T+1 या T+5 rule blindly apply नहीं होता।
अगर आपने गलती से किसी wrong person को UPI payment भेज दी है, तो वह भी अलग situation है। उसके लिए UPI में गलत व्यक्ति को पैसे भेज दिए तो क्या करें? वाला guide देखें।
Debit या Credit Card Refund नहीं आया तो?
Card payment में भी पहले original transaction type identify करें।
अगर card account debit हुआ लेकिन online merchant system को confirmation नहीं मिला, RBI के failed-transaction framework में Card Not Present यानी e-commerce transaction के लिए auto-reversal T+5 days तक prescribed है।
लेकिन अगर purchase successfully complete हुई थी और बाद में order cancel या return हुआ, तो यह merchant-initiated refund है।
ऐसी situation में merchant से ये details लें:
- Refund initiation date
- Refund amount
- Refund/reference number
- Original transaction date
- Order ID
फिर अपने card issuer या bank से इन details के साथ refund trace करने के लिए कहें।
किसी support agent को full card number, CVV, PIN या OTP share न करें।
Bank में Complaint कब करें?
अगर merchant ने अभी refund initiate ही नहीं किया है, तो पहले merchant से follow-up करना logical है।
लेकिन merchant कह रहा है कि refund process कर दिया गया है और उसकी बताई timeline भी निकल चुकी है, तो अपने bank, card issuer या payment provider से complaint करें।
Complaint करते समय ये details ready रखें:
- Transaction ID
- Amount
- Payment date
- Merchant name
- Refund initiation date
- Refund reference
- Merchant confirmation
Bank से complaint/reference number ज़रूर लें।
जहाँ possible हो, complaint का written record रखें—email, grievance form या support ticket के रूप में।
सिर्फ phone call पर depend करने से बाद में यह prove करना मुश्किल हो सकता है कि complaint कब की गई थी।
Merchant और Bank दोनों एक-दूसरे के पास भेजें तो?
यह refund cases में काफी frustrating situation होती है।
Merchant कहता है:
“हमने refund कर दिया, bank से बात करें।”
Bank कहता है:
“हमें refund नहीं मिला, merchant से पूछें।”
ऐसे में verbal conversation छोड़कर documentation पर जाएँ।
Merchant से लिखित confirmation लें:
Refund कब initiate हुआ?
Amount कितना था?
Reference number क्या है?
फिर वही proof bank complaint में attach करें।
अगर bank भी written response देता है, तो उसे save करें।
अब आपके पास complete timeline होगी:
Payment → Cancellation → Refund Initiated → Bank Complaint → Bank Response
यही sequence आगे escalation में काम आता है।
हर Refund पर RBI की T+5 Timeline लागू नहीं होती
यह misconception avoid करना बहुत ज़रूरी है।
RBI का TAT और compensation framework specific failed transactions के लिए है।
इसका मतलब यह नहीं कि:
“मैंने shopping order cancel किया है, इसलिए merchant को हर हाल में T+5 में refund देना ही होगा।”
अगर merchant को original payment successfully मिल चुकी थी और उसके बाद cancellation या return हुआ, तो वह failed transaction से अलग process है।
इसी तरह ₹100 per day compensation वाले rule को भी हर delayed merchant refund पर apply नहीं करना चाहिए।
इस तरह के blanket claims social media या videos में attractive लग सकते हैं, लेकिन complaint करते समय transaction category सही होना ज़्यादा important है।
Refund Complaint का सही Sequence
अगर पूरा process एक simple workflow में देखें तो यह ऐसा होगा:
Transaction status check करें
→ payment method confirm करें
→ cancellation और refund status देखें
→ refund initiation proof लें
→ merchant की timeline note करें
→ original account/card statement check करें
→ timeline निकलने पर bank/payment provider को complaint दें
→ complaint reference save करें
→ जरूरत पर grievance escalate करें
इस sequence का फायदा यह है कि आप random customer-care calls नहीं कर रहे हैं।
हर अगले step पर आपके पास previous step का proof है।
Complaint Resolve न हो तो आगे क्या?
अगर आपका issue bank या किसी covered regulated entity की service deficiency से जुड़ा है और internal grievance process से satisfactory resolution नहीं मिलता, तो RBI grievance mechanism अगला escalation option हो सकता है।
Reserve Bank – Integrated Ombudsman Scheme, 2026 1 July 2026 से effective है और इसने 2021 Scheme को replace किया है। Online complaints RBI के Complaint Management System यानी CMS के जरिए lodge की जा सकती हैं।
लेकिन RBI Ombudsman को merchant refund का automatic refund button न समझें।
पहले संबंधित bank या regulated entity के grievance process का इस्तेमाल करना चाहिए और complaint records संभालकर रखने चाहिए।
Escalation करते समय original transaction proof, merchant communication, bank complaint number और responses useful रहेंगे।
Refund के नाम पर Scam से बचें
Refund का इंतज़ार कर रहा user अक्सर जल्दी solution चाहता है।
इसी urgency का scammers फायदा उठा सकते हैं।
अगर कोई कहे:
“Refund पाने के लिए QR scan करें।”
“UPI PIN डालें।”
“OTP बताएं।”
“Screen-sharing app install करें।”
तो आगे न बढ़ें।
Refund trace या receive करने के नाम पर UPI PIN, OTP, CVV, card PIN या internet banking password share न करें।
Random Google search result में दिखने वाले किसी phone number को official customer care मानने से भी बचें। Bank या merchant के official app/website में दिए support channels use करें।
UPI fraud के common patterns समझने के लिए UPI Scam से कैसे बचें? ठगी के 8 आम तरीके और जरूरी Safety Tips पढ़ सकते हैं।
एक Practical Example से समझें
मान लीजिए आपने ₹8,000 का product online खरीदा।
UPI payment successful हुई।
अगले दिन order cancel हो गया।
Merchant ने दो दिन बाद status दिखाया:
Refund Initiated.
अब आपको क्या करना चाहिए?
पहले original transaction और refund status का screenshot लें।
Refund initiation date note करें।
Merchant की expected timeline देखें।
Available refund reference save करें।
Original bank account statement check करें।
अगर timeline निकलने के बाद भी पैसा नहीं आता, तो merchant से written confirmation लें और वही details bank complaint में दें।
Bank complaint number भी save करें।
अगर issue फिर भी unresolved रहता है, तो applicable grievance escalation route देखें।
यही structured approach सबसे practical है।
आगे से Refund Track करना आसान कैसे बनाएं?
Expensive online purchase में payment और refund records तुरंत delete न करें।
Invoice save रखें।
Cancellation acknowledgement संभालें।
Refund confirmation का screenshot रखें।
Transaction ID और refund reference note करें।
अगर amount बड़ा है तो एक छोटा record बना सकते हैं:
Original Payment: 20 September
Order Cancelled: 21 September
Refund Initiated: 22 September
Refund Reference: XXXXX
Bank Complaint: 29 September
Complaint Number: XXXXX
इससे customer care से बात करते समय आपको पूरी story दोबारा याद नहीं करनी पड़ेगी।
आख़िर में एक छोटी सी बात
Online Payment Refund नहीं आया तो सबसे पहले यह identify करें कि आपका मामला merchant refund, failed transaction या सिर्फ़ processing delay है।
अगर merchant refund है, तो refund initiation date और reference लें।
अगर failed transaction है, तो applicable payment-system reversal timeline check करें।
और अगर merchant कह रहा है कि refund process हो चुका है लेकिन पैसे account या card में दिखाई नहीं दे रहे, तो transaction proof और refund reference के साथ bank/payment provider को complaint दें।
सबसे useful habit यह है:
Transaction ID → Refund Proof → Reference Number → Complaint Number
इन चार चीज़ों का record रखें।
और सिर्फ “refund initiated” notification देखकर मामला closed न मानें—refund original payment method में दिखाई देने तक status track करते रहें।
अगर आपका कोई online refund अभी अटका हुआ है, तो comment में बताएं कि payment UPI, debit card, credit card या किसी दूसरे method से की थी और merchant अभी क्या status दिखा रहा है। आपका सवाल किसी दूसरे reader की भी वही confusion solve कर सकता है।
Keywords: Online Payment Refund नहीं आया, Online Payment Refund, Refund Pending, UPI Refund नहीं आया, Card Refund नहीं आया, Merchant Refund, Failed Transaction Refund, Refund Status Check, Bank Refund Complaint, UPI Failed Transaction, RBI Failed Transaction Rules, Digital Payment Refund