














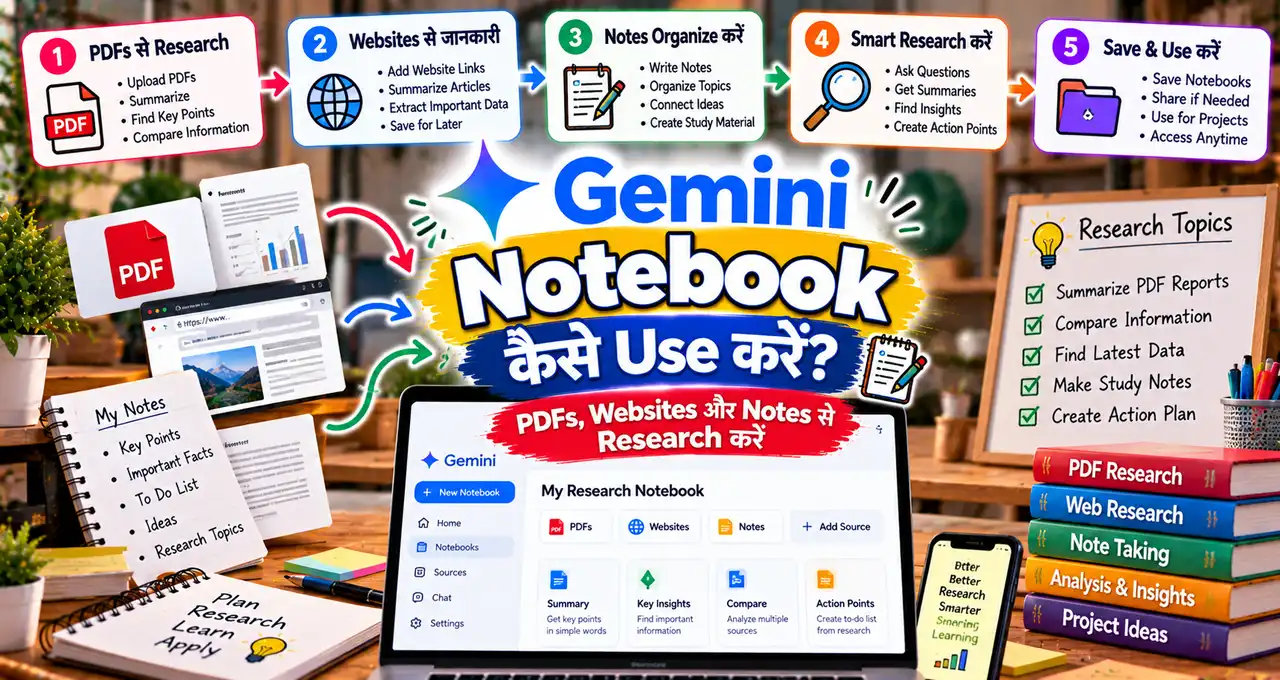






Gemini Notebook research को आसान बनाता है क्योंकि आप अपने चुने हुए sources के साथ एक focused workspace बना सकते हैं।
Google ने July 2026 में NotebookLM का नाम बदलकर Gemini Notebook किया। वही research-focused product अब Gemini ecosystem में ज्यादा tightly connected है, और आप PDFs, websites, YouTube videos, audio files, Google Docs और Slides जैसे sources जोड़कर उन्हीं पर grounded questions पूछ सकते हैं।
इस guide में नया notebook बनाने, sources add करने, citations check करने, notes organize करने और practical research workflow बनाने का तरीका समझेंगे।
इस लेख में आप क्या सीखेंगे?
- Gemini Notebook setup करना
- PDF और website जोड़ना
- Source-grounded questions पूछना
- Citations verify करना
- Notes organize करना
- Research workflow बनाना
Gemini Notebook क्या है?
Gemini Notebook Google का AI-powered research assistant है, जिसे पहले NotebookLM कहा जाता था। इसका core idea simple है: आप अपने project से जुड़े sources एक notebook में रखते हैं और AI उन्हीं sources के context में summary, comparison, explanation और research support देता है।
Google की current help documentation के अनुसार supported sources में PDFs, websites, YouTube videos, audio, Google Docs और Google Slides शामिल हो सकते हैं। Gemini Notebook chat आपके selected sources पर grounded responses देता है और inline citations दिखा सकता है, ताकि आप answer को original source से verify कर सकें।
अगर AI tools की basic working पहले समझनी हो, तो AI क्या है और कैसे काम करता है वाली beginner guide useful रहेगी।
Gemini Notebook और Normal AI Chat में क्या Difference है?
Normal AI chat में आप question पूछते हैं और model general knowledge, supplied context या available tools से answer बना सकता है। Gemini Notebook का main focus आपके चुने हुए source collection पर research करना है।
उदाहरण के लिए:
आपके पास 4 PDFs, 2 websites और 1 Google Doc हैं। इन्हें एक notebook में add करने के बाद आप पूछ सकते हैं:
- इन सभी sources का common conclusion क्या है?
- PDF A और Website B कहाँ disagree करते हैं?
- कौन-से points सिर्फ़ एक source में आए हैं?
- इस topic की timeline बनाओ.
- मेरे लिए study guide बनाओ.
यह workflow खास तौर पर useful है जब information एक ही जगह नहीं, कई documents में scattered हो।
Gemini App के Notebooks और Gemini Notebook में क्या Relation है?
Google ने 2026 में Gemini app में भी notebooks introduce किए, जिन्हें personal knowledge bases की तरह use किया जा सकता है। Official Google announcement के अनुसार notebooks Gemini app और Gemini Notebook के बीच sync हो सकते हैं, ताकि एक जगह add किए गए sources दूसरी जगह भी काम आएँ।
Practical difference यह है कि Gemini app में notebook project context और ongoing chats organize करने में useful हो सकता है, जबकि standalone Gemini Notebook research-oriented features पर ज्यादा focused रहता है।
उदाहरण के लिए, आप Gemini app में project notebook बनाकर files और chats organize कर सकते हैं, फिर उसी synced notebook को Gemini Notebook में खोलकर source-based briefing, mind map या दूसरे research formats explore कर सकते हैं।
Feature availability plan, account type, country और rollout पर depend कर सकती है। इसलिए किसी specific button या limit को permanent मानने की बजाय current Google help page check करें।
Step 1: नया Notebook कैसे बनाएँ?
Gemini Notebook खोलने के बाद नया notebook create करें और उसे clear project name दें।
Weak name:
“Research 1”
Better name:
“Solar Rooftop Policy Research — India 2026”
Clear naming बाद में multiple notebooks manage करना आसान बनाती है। Google के current help page के अनुसार notebooks independent होते हैं; एक notebook दूसरे notebook की information automatically access नहीं करता। इसलिए unrelated projects को एक ही notebook में mix करने से बचें।
Step 2: Sources Add करें
Notebook बनाते समय पहले source quality पर ध्यान दें। Quantity ज्यादा होना जरूरी नहीं है।
आप source mix ऐसा रख सकते हैं:
- Official documentation.
- Government/organization report.
- Research paper or PDF.
- Company/product help page.
- Your own notes.
- Relevant Google Doc.
- Useful video transcript/source.
एक ही weak article के 10 copies add करने से research मजबूत नहीं होती। अलग viewpoints और primary sources ज्यादा useful हो सकते हैं।
अगर PDF copy-protected हो या source import fail हो, तो Google की help documentation में source limitations check करें। Current documentation per-source word/file-size limits भी बताती है, जो समय के साथ बदल सकती हैं; इसलिए large upload से पहले official help page verify करना बेहतर है।
Sources Select करने की 6-Point Checklist
हर source add करने से पहले छह सवाल पूछें:
- Authority: Source कौन publish कर रहा है?
- Date: Information current है या पुरानी?
- Purpose: Education, marketing, opinion या official documentation?
- Evidence: Claims के पीछे data/source दिया है?
- Scope: Source आपके exact research question पर लागू होता है?
- Balance: क्या notebook में सिर्फ़ एक ही viewpoint है?
अगर research current policy या product feature पर है, तो official help/documentation को priority दें। अगर opinion compare करना है, तो multiple credible perspectives रखें।
Source list में हर item के साथ short note लिखना useful है: “यह source क्यों add किया?” इससे बाद में irrelevant documents remove करना आसान होता है।
Step 3: पहला Question Summary नहीं, Source Map पर पूछें
सीधे “सब summarize करो” पूछने की बजाय पहले notebook का map बनवाएँ।
मेरे notebook के सभी selected sources को review करें।
Output:
1. हर source का main purpose.
2. हर source किस question का answer देता है.
3. कौन-से sources primary हैं और कौन secondary.
4. कौन-से sources same point repeat करते हैं.
5. कहाँ disagreement या conflicting data है.
6. कौन-सी important information अभी missing है.हर claim के साथ source citation दें।
अगर कोई conclusion sources में नहीं है तो उसे infer न करें।
यह prompt आपको जल्दी बताता है कि source collection balanced है या नहीं।
Step 4: Citations को कैसे Use करें?
Gemini Notebook का useful feature source-grounded citations हैं। लेकिन citation दिखना final verification का substitute नहीं है।
Best workflow:
AI Answer
↓
Citation खोलें
↓
Original paragraph देखें
↓
Date/context check करें
↓
तभी note बनाएं
खासकर numbers, dates, legal rules, medical claims, product limits या current policy जैसी information में cited source का exact context देखना जरूरी है।
AI confident होकर गलत inference कर सकता है। ऐसी errors पहचानने के लिए AI Hallucination guide useful background देती है।
PDF Research का Practical Workflow
मान लीजिए आपके पास 80-page report है। पूरा document line-by-line पढ़ने से पहले notebook से structured orientation लें।
पहला prompt:
इस PDF का structure समझाएं।
Output:
– Report का purpose.
– Main sections.
– 10 important findings.
– सभी quantitative claims की list.
– Methodology कहाँ explain की गई है.
– Limitations क्या हैं.
– कौन-से findings executive summary में हैं लेकिन detail section में nuance बदलता है.हर point के साथ citation दें।
फिर specific section पर deep dive करें।
इस तरीके से AI navigation assistant बनता है, जबकि final interpretation original PDF देखकर की जाती है।
Multiple PDFs Compare कैसे करें?
Comparison research में source period और definitions match करना important है।
Source A, Source B और Source C को compare करें।
Table columns:
Topic
Source A position
Source B position
Source C position
Agreement
Conflict
Different definitions
Evidence strength
CitationRules:
– Different years को directly comparable न मानें.
– अलग methodology हो तो flag करें.
– Missing data को blank/Not Available रखें.
– Consensus invent न करें.
यह workflow academic research, product comparison, policy reading और business research में useful हो सकता है।
Website Research में क्या ध्यान रखें?
Website source add करते समय page की date और ownership देखें। Company की own product page product features के लिए primary source हो सकती है, लेकिन independent performance comparison के लिए नहीं।
इसी तरह old article current policy के लिए stale हो सकता है।
Notebook में source title के साथ check date note करना useful habit है:
Source: Google Help — Gemini Notebook
Checked: 14 Oct 2026
Use: Features और workflow
Current technology tools तेजी से बदलते हैं, इसलिए published date और last update देखना research quality improve करता है।
Notes को सिर्फ़ Copy-Paste Archive न बनाएं
Useful notes तीन layers में रखें:
Facts
Source में explicitly क्या लिखा है?
Interpretation
आप उस fact से क्या समझ रहे हैं?
Open Question
क्या अभी verify करना बाकी है?
Example:
Fact: Product supports PDF and website sources.
Interpretation: Multi-source research के लिए useful हो सकता है.
Open Question: मेरे account/plan पर कितने sources allowed हैं?
इस separation से AI-generated summary और verified source fact mix नहीं होते।
Gemini Notebook से Study Guide कैसे बनाएं?
Google current product documentation study guides, briefings, audio overviews, mind maps और दूसरे source-based formats का mention करती है।
Study use में यह prompt practical है:
मेरे selected sources से exam-oriented study guide बनाएं।
Include:
1. Key concepts.
2. Definitions.
3. Important examples.
4. Cause-effect relationships.
5. Commonly confused points.
6. 15 self-test questions.
7. Answer key with citations.
8. Topics where sources disagree.Source से बाहर facts add न करें।
Students AI का broader सही use समझना चाहते हों तो AI से पढ़ाई कैसे करें guide useful रहेगी।
Research Brief कैसे बनाएँ?
Business या content research में notebook को final writer की बजाय evidence organizer बनाना बेहतर है।
मेरे notebook sources से एक research brief बनाएं।
Sections:
Research question
Key facts
Important numbers
Source disagreements
Risks/limitations
What is still unknown
Primary sources to cite
Possible article outlineहर factual claim के साथ source citation दें।
Opinion और source-derived fact अलग रखें।
उस brief को बाद में article, presentation या report में convert किया जा सकता है।
Custom Instructions कब Useful हैं?
अगर आपका research project long-running है, तो notebook को project rules देना useful हो सकता है।
Example:
इस notebook में:
– Current claims पर source date हमेशा दिखाएं.
– Numbers बिना citation के न दें.
– Company marketing claim और independent evidence अलग रखें.
– Missing data invent न करें.
– Contradictory sources दोनों दिखाएं.
– Hindi-English simple language use करें.
अच्छी prompt structure सीखने के लिए Prompt Engineering की practical guide relevant है।
Gemini Notebook कब Use नहीं करना चाहिए?
हर task को notebook project बनाने की जरूरत नहीं है। अगर सिर्फ़ एक simple current fact चाहिए, तो normal search या direct source ज्यादा fast होगा।
Notebook avoid या carefully use करें जब:
- आपके पास source permission नहीं है.
- File में highly sensitive personal/client data है.
- Research question current live data पर depend करता है लेकिन notebook sources stale हैं.
- आप सिर्फ़ एक छोटी webpage का quick answer चाहते हैं.
- Final decision medical, legal या financial professional judgment मांगता है.
Gemini Notebook evidence organize कर सकता है; domain responsibility खत्म नहीं करता।
Privacy और Sharing में क्या Check करें?
Notebook share करने से पहले source permissions समझें। Google help documentation Viewer और Editor access जैसे sharing options explain करती है और यह भी caution करती है कि shared users underlying sources/artifacts तक पहुँच सकते हैं।
इसलिए confidential client files, private financial documents, personal IDs या sensitive internal reports upload/share करने से पहले organization policy और access controls verify करें।
AI tools में personal data handling के practical rules AI Privacy guide में detail से समझाए गए हैं।
Common Mistakes
- हर source को equally trustworthy मानना.
- Old page की date ignore करना.
- Citation खोले बिना answer copy करना.
- Different definitions वाले reports compare करना.
- एक notebook में unrelated projects mix करना.
- AI summary को original source का replacement मानना.
- Sensitive files बिना permission check upload करना.
- Missing information पर AI से guess करवाना.
15-Minute Research Workflow
Minute 1–3: Research question define करें और notebook बनाएं.
Minute 4–6: 3–5 strongest sources add करें.
Minute 7–8: Source map prompt चलाएं.
Minute 9–11: Specific comparison/question पूछें.
Minute 12–13: Citations open करके important claims verify करें.
Minute 14: Fact/Interpretation/Open Question notes बनाएं.
Minute 15: Missing source की list बनाएं.
Research project बड़ा हो तो यही cycle बार-बार repeat करें।
आख़िर में एक छोटी सी बात
Gemini Notebook का सबसे useful use “AI से answer लेना” नहीं, बल्कि trusted sources को एक जगह organize करके evidence-based questions पूछना है। Citations, source dates और missing information check करने की habit रखें, तभी notebook research shortcut की बजाय reliable research workflow बनेगा।
आप Gemini Notebook किस काम के लिए use करना चाहते हैं—study, business research या article research? अपना use case comments में बताइए। अगर guide useful लगी, तो इसे उस व्यक्ति के साथ share करें जो PDFs और websites से बार-बार research करता है।