मान लीजिए, wholesale market में बच्चों का pencil pouch ₹65 का दिखा। Instagram पर वैसा product ₹199 में बिकता नजर आया, तो क्या 100 pieces खरीद लेने चाहिए?
सस्ता wholesale price अपने-आप profit नहीं बनाता। Instagram पर Kids Products बेचने से पहले demand, product safety, delivery और returns का हिसाब लगाना ज़रूरी है।
इस guide में हम school supplies और बच्चों के सामान के उदाहरण से पहले product चुनने, Instagram पर enquiries लाने और customer तक order पहुँचाने का पूरा तरीका देखेंगे। साथ में ऐसा छोटा testing plan बनाएँगे जो बड़े stock में पैसा फँसाने से बचाए।
पहला सवाल बेचने का नहीं, यह है: बिना बड़ा stock खरीदे कैसे पता चले कि ग्राहक सचमुच पैसे देने को तैयार हैं?
इस लेख में आप क्या सीखेंगे?
- सही kids products चुनना
- Wholesale supplier की जाँच
- Instagram पर selling setup
- Enquiry से confirmed order
- हर order का profit
- Stock और returns control
Wholesale में सस्ता मिला सामान क्या Instagram पर बिक जाएगा?
मान लीजिए दो sellers एक जैसे school pouches बेच रहे हैं।
एक ने wholesale rate देखकर तुरंत 150 pieces खरीद लिए। दूसरे ने पाँच samples लेकर फोटो बनाईं, enquiries देखीं और फिर 20 pieces का पहला batch लिया।
दूसरे seller के पास भी नुकसान का risk है, लेकिन उसने अपने शुरुआती फैसले छोटे रखे। पहले product की demand जाँची, फिर stock बढ़ाया।
Instagram followers या reels views को confirmed orders समझना गलती है।
अगर आप पहली बार business idea test कर रहे हैं, तो market validation का तरीका समझें। इस article में हम उसी सिद्धांत को बच्चों के सामान की Instagram selling पर लागू करेंगे।
इस business का शुरुआती लक्ष्य viral reel नहीं, एक ऐसा order है जिसमें product सही निकले, customer को समय पर मिले और सारे खर्च काटने के बाद कुछ रकम बचे।
शुरुआत में कौन-से बच्चों के Products चुनें?
हर बच्चों वाला product एक जैसा नहीं है।
हल्के, टूटने की कम आशंका वाले और आसानी से समझाए जा सकने वाले items का sample test करना सुविधाजनक हो सकता है। लेकिन किसी category को बेचने से पहले उसके लागू safety और labelling नियम देखें।
| Product idea | किस बात से शुरुआत करें? | मुख्य risk |
|---|---|---|
| Pencil pouch, folders, stickers | Design, stitching, actual material | कमजोर zip, misleading photos |
| School stationery combo | सही quantity और useful items | कम margin, incomplete kit |
| Lunch box, bottle, school accessories | Material और applicable labels | Leakage, breakage, quality complaints |
| Art/activity supplies | Age suitability और contents | Small parts, unsuitable material |
| Educational toys | Product quality और verified certification | Safety compliance, defects |
इस सूची का मतलब यह नहीं है कि हर item हर उम्र के लिए सुरक्षित है। खासकर toys के लिए supplier के किसी मौखिक दावे पर भरोसा न करें।
सिर्फ महँगा दिखने वाला item चुनने के बजाय वह product लें जिसकी 15-second reel में असली उपयोगिता दिखाई जा सके।
स्कूल pouch में pockets, material और zipper दिखाएँ। Stationery kit में हर included item सामने रखें।
यदि अभी idea shortlist नहीं हुआ है, तो product demand research के prompts से competitor और customer questions की सूची बना सकते हैं। इसे real orders का विकल्प न समझें।
Wholesale Market जाने से पहले Product Research कैसे करें?
Instagram पर दूसरे sellers की reels, comments और public product descriptions देखें।
बार-बार पूछे जाने वाले सवाल लिखें: delivery कहाँ तक है, product असल में कितना बड़ा है, कितने pieces मिलेंगे और material क्या है?
एक simple sheet बनाएँ।
प्रत्येक shortlisted product के लिए wholesale quote, minimum order quantity (MOQ), target customer, expected sale price, estimated shipping, comparable products और possible defects दर्ज करें।
Demand पहचानने के 3 छोटे संकेत
- वही product अलग sellers के catalog में दिखता है, लेकिन केवल views नहीं, buyer enquiries भी नजर आती हैं।
- Parents, guardians या teachers किसी वास्तविक समस्या का समाधान पूछते हैं, जैसे leak-proof bottle या व्यवस्थित stationery kit।
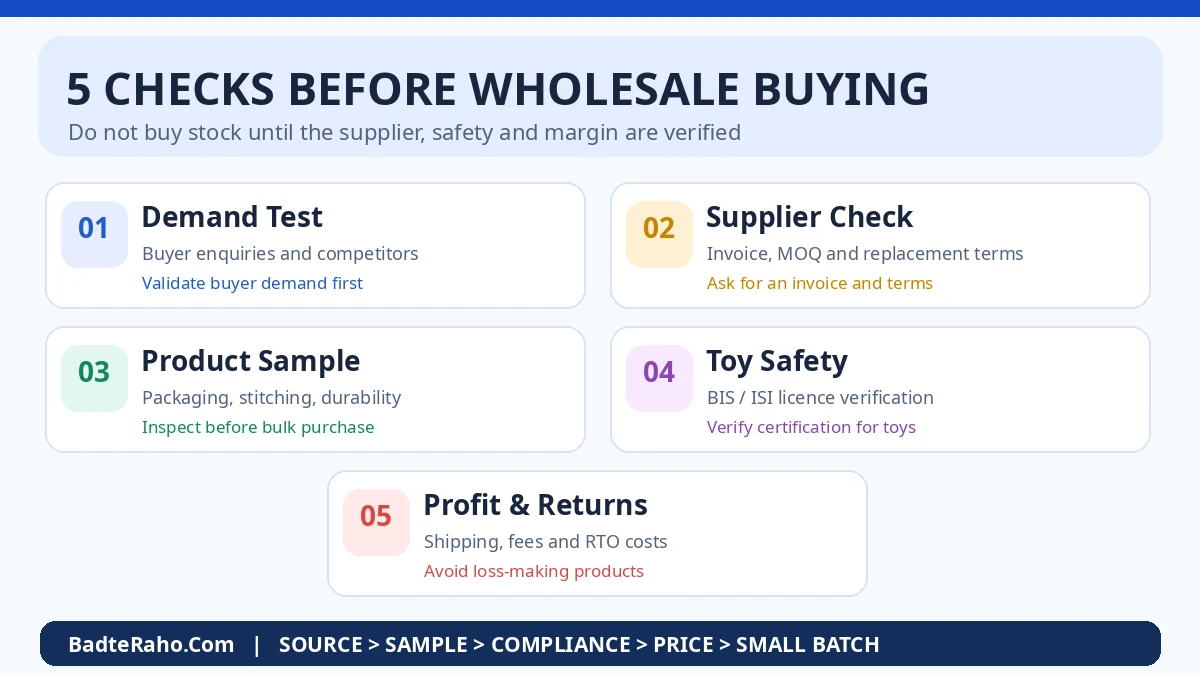
- Supplier reasonable samples, consistent stock और replacement terms देने को तैयार है।
ये signals खरीद की गारंटी नहीं हैं।
Enquiry और order अलग रखें।
अपने account पर product दिखाकर price जानने वालों और order confirm करने वालों की संख्या अलग-अलग रिकॉर्ड करें।
Supplier से सामान लेने से पहले क्या Verify करें?
Wholesaler से rate पूछना पहला सवाल है, आखिरी नहीं।
Price के साथ proof भी चाहिए।
वही product अलग batches में बदल सकता है, इसलिए sample और supplier terms का proof रखें।
| Supplier से पूछें | क्यों ज़रूरी है? |
|---|---|
| GST/business invoice मिल सकता है? | Purchase record और compliance |
| MOQ और mixed designs की शर्त? | Unwanted inventory से बचाव |
| Damage पर replacement किसके खर्च पर? | Returns की असली लागत |
| Same design फिर available रहेगा? | Successful product restock करना |
| Packaging, MRP और product details? | Accurate listing और labelling |
| Toy के लिए BIS licence details? | Applicable safety requirement verify करना |
Toy safety को optional checklist न बनाएँ।
भारत में Toys (Quality Control) Order के दायरे में आने वाले toys पर लागू Indian Standards और BIS Standard Mark (ISI) की requirements पूरी होनी चाहिए।
BIS की compulsory certification सूची में non-electric और electric toys के standards देखें। फिर BIS Care app के Verify Licence Details विकल्प से supplier द्वारा दिया licence number जाँचें।
Retailer होने से जिम्मेदारी खत्म नहीं होती। Product के mark, manufacturer details और invoice को मिलाएँ। Licence या marking संदिग्ध हो तो stock लेने के बजाय पहले जानकारी स्पष्ट करवाएँ।
Pre-packaged goods के मामले में MRP, manufacturer/importer, quantity और customer-care जैसी applicable declarations भी जाँचें।
Department of Consumer Affairs की Legal Metrology guidance उपयोगी है। MRP से ऊपर बेचने या गलत claim लिखने का risk न लें।
अगर supplier कोई ज़रूरी document नहीं देता, तो दूसरे supplier को चुनना बेहतर test हो सकता है। बहुत कम price के कारण safety या authenticity पर समझौता नहीं करें।
पहला Stock कितना खरीदें? Sample-First Model अपनाएँ
एकदम 100–200 pieces लेने के बजाय पहले 3–5 product types के samples जाँचें।
हर sample की clear photo, short video और defects list बनाएं। जो product खरीदार को भेजने योग्य न हो, उसे सिर्फ reel में अच्छा दिखने पर shortlist में न रखें।
फिर 1–2 promising products पर छोटा paid test करें।
पहले छोटा batch।
उदाहरण के लिए एक design के 10–20 pieces तभी लें जब supplier MOQ, आपके budget और शुरुआती enquiries के हिसाब से यह उचित हो। यह कोई fixed industry standard नहीं, risk-control के लिए illustrative approach है।
आप चाहें तो पहले केवल sample catalogue से interest जाँच सकते हैं।
लेकिन stock में न होने वाले product को “ready to ship” न बताएं। Pre-order लें तो स्पष्ट lead time, cancellation और refund terms बताएँ।
जो पैसा अगले महीने की ज़रूरत के लिए रखा है, उसे शुरुआती inventory में न लगाएँ। Learning budget और household budget अलग रखें। घर से business शुरू करने के विकल्प भी इसी निर्णय को आसान बनाते हैं।
Instagram Business Account से Customers तक कैसे पहुँचें?
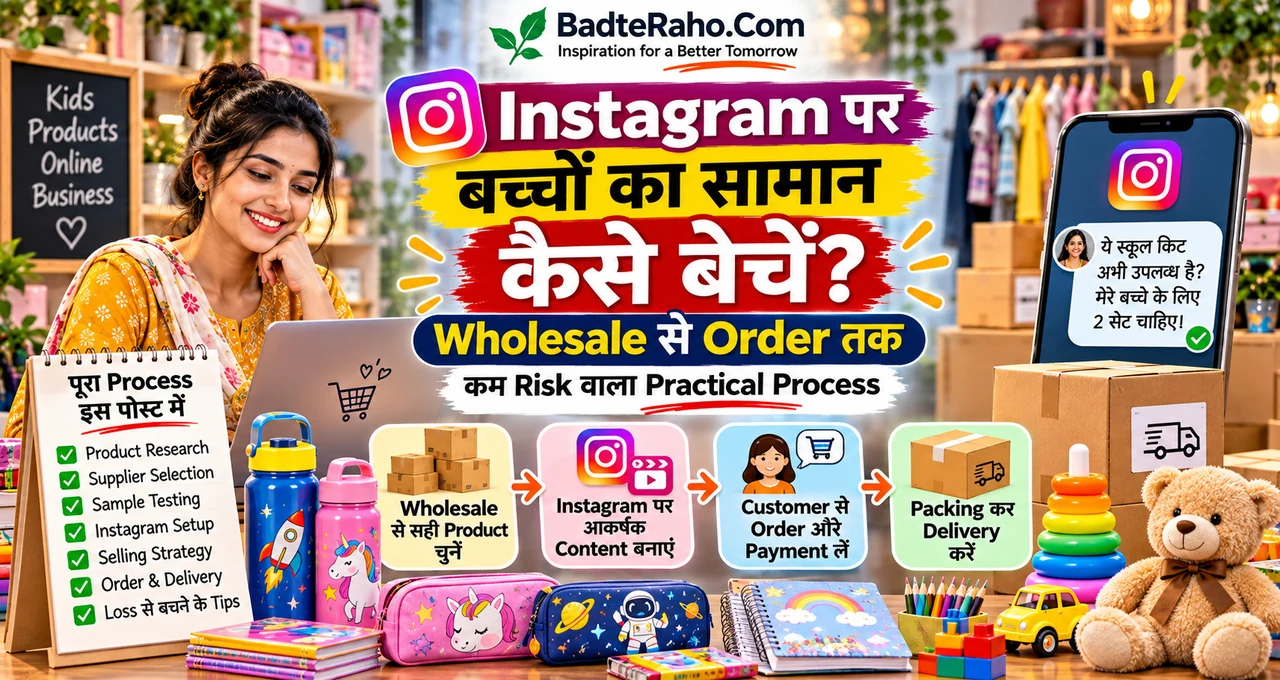
इस overview में product research से लेकर delivery, profit review और reorder तक का flow एक साथ देखें। Visual में दिखाई गई कीमतें केवल समझाने के लिए उदाहरण हैं।
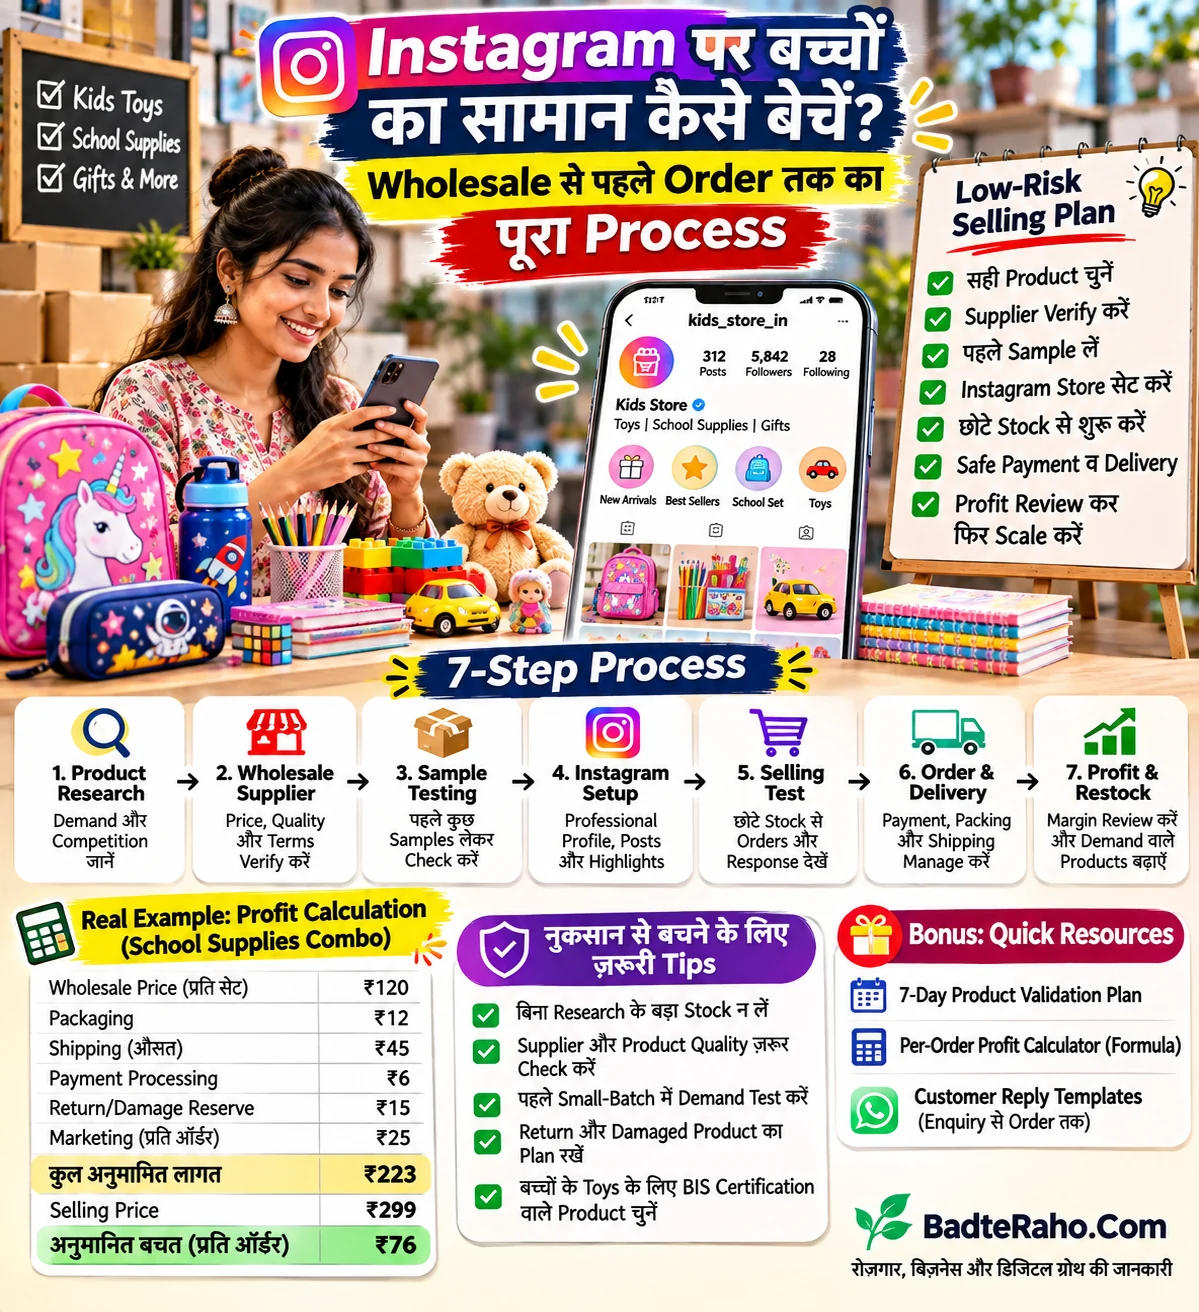
Illustrative workflow: वास्तविक wholesale quotation, toy compliance और order costs अलग-अलग verify करें।
Instagram को शुरुआत में अपनी दुकान का discovery channel मानें।
Reels और posts से product दिखाई देगा, लेकिन orders Instagram DM, WhatsApp Business या अपनी website के जरिए संभाले जा सकते हैं।
Step 1: Professional Profile और भरोसा बनाएं
Business के लिए clear profile name, recognizable logo या product image, short bio और contact route रखें।
Highlights में Products, Price, Delivery, Reviews और Return Policy जैसी जानकारी व्यवस्थित करें।
Bio में ऐसा संदेश लिख सकते हैं: “Kids school supplies और stationery combos | Order details WhatsApp पर | Delivery coverage और charges confirm करें।” केवल वही shipping claim लिखें जिसे आप निभा सकें।
Step 2: Product Listing को पूरा रखें
हर product के लिए कम से कम clear front photo, actual-size reference, quantity, material, available variants, age guidance जहाँ ज़रूरी हो, selling price और delivery charges दें। “Best quality” जैसे अस्पष्ट दावे के बजाय ज़रूरी product details बताएं।
Photos बेहतर बनाने के लिए product photography और marketing creatives वाले prompts इस्तेमाल कर सकते हैं।
लेकिन AI से नई pocket, गलत colour या fake packaging न जोड़ें।
Step 3: Content से सही Audience लाएँ
पहले तीन प्रकार की reels test करें: product demo, kit में क्या-क्या है, और packing/size/quality का honest close-up।
उदाहरण: “इस pouch में pencil, eraser और ruler कैसे fit होते हैं?”
Caption में product code, price, delivery area और enquiry का तरीका लिखें।
Parents, guardians और teachers की जरूरत पर बात करें; बच्चों को खरीदने के लिए सीधे pressure न डालें।
Reel पर अच्छे views आने से पहले ही ads पर बड़ा खर्च करना ज़रूरी नहीं है।
Social media planning से छोटे content batch का workflow समझें।
Step 4: WhatsApp Catalog और Order Route तय करें
WhatsApp Business catalog में प्रत्येक item की photo, name, available details और product code रख सकते हैं। इसकी official catalog guidance देखें। Product list को व्यवस्थित करने के लिए WhatsApp catalog guide भी पढ़ें।
Instagram के Shopping features, product tags या checkout को हर account में guaranteed feature न मानें।
Eligibility और supported country/region नियम लागू होते हैं। कुछ sellers के लिए professional profile के साथ DM/WhatsApp वाला model अधिक सीधा रहेगा।
Instagram पर दिखाई देने वाला interest और WhatsApp में पक्का order दो अलग stages हैं। एक sheet में दोनों की गिनती अलग रखें।
Enquiry से Order Delivery तक Standard Process
पहला customer message आया, तो product भेजने की जल्दी में price, address या stock verify करना न भूलें।
एक छोटा standard operating procedure दोहराई जाने वाली गलतियाँ कम करता है।
- Customer से product code, quantity, colour/design और delivery PIN code लें।
- Stock, total selling price, shipping charge, expected dispatch और policy साफ बताएं।
- Customer की सहमति मिलने पर verified payment method बताएं; screenshot को payment proof न मानें, अपने account में receipt confirm करें।
- Order ID बनाएं और customer का नाम, contact, address और payment status अपने private order register में रखें।
- Dispatch से पहले product, accessories, labels और packing की quality check करें।
- Tracking ID साझा करें और delivery exception आने पर customer को update दें।
- Delivered, returned, refunded या RTO status record करके actual order margin update करें।
Customer की photos, phone number या delivery address public reels में न दिखाएँ। Courier label की photo share करनी हो तो निजी details blur करें।
WhatsApp पर पूछताछ का Reply
नमस्ते! [Product name/code] अभी [stock status] में है। इसकी कीमत ₹[verified price] है और [PIN code] के लिए shipping ₹[charge] होगी। क्या मैं size, material और product की actual photos भेज दूँ?
Order Confirm करने का Reply
आपका [Product code] × [Quantity] का total ₹[amount] है, जिसमें shipping [included/separate] है। अनुमानित dispatch [date/working days] है। कृपया address और order details confirm करें; payment हम receipt verify होने के बाद mark करेंगे।
Dispatch Update
आपका order [Order ID] [date] को dispatch हुआ है। Tracking ID [ID] और courier [name] है। कोई delivery issue आए तो इसी chat पर बताएँ।
इन templates में blank fields को अपने verified data से भरें। Customer से unnecessary personal details न माँगें।
₹299 का School Supplies Combo: Profit कैसे Calculate करें?
मान लीजिए आपने illustrative combo बनाया और ₹299 में बेचने का फैसला किया।
नीचे दिए गए rates सिर्फ calculation समझाने के लिए assumptions हैं। इन्हें किसी wholesale market की verified quotation नहीं मानें।
| खर्च का प्रकार | एक order पर राशि |
|---|---|
| Product का wholesale cost | ₹120 |
| Packaging | ₹12 |
| Shipping | ₹45 |
| Payment processing | ₹6 |
| Return/damage reserve (औसत अनुमान) | ₹15 |
| Marketing allocation | ₹25 |
| कुल estimated cost | ₹223 |
| Selling price | ₹299 |
| बची रकम | ₹76 |
हिसाब: ₹299 − ₹223 = ₹76 यानी बिक्री का लगभग 25.4% contribution।
यह final net profit नहीं है। Applicable GST, fixed overhead, unsold stock, discounts और वास्तविक return losses अलग से असर डाल सकते हैं।
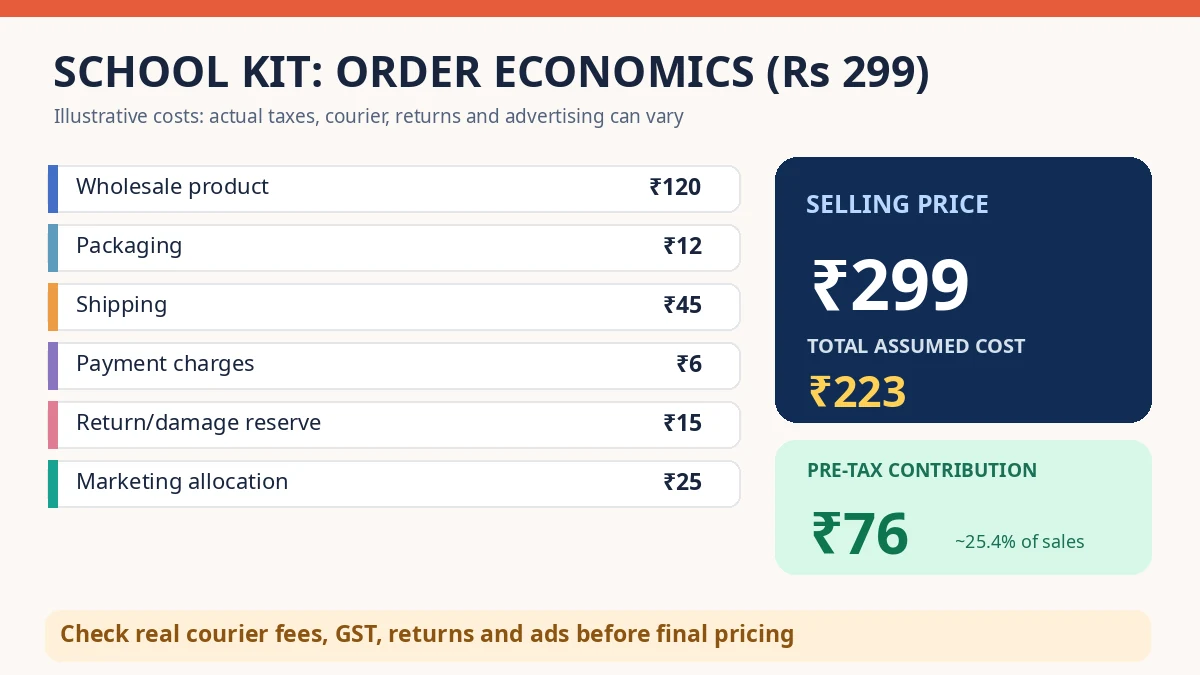
अब एक decision देखें।
यहीं marketing cost का असर दिखेगा।
यदि marketing allocation ₹25 से बढ़कर ₹85 हो जाए, तो उसी order पर बची रकम ₹16 रह जाएगी। इसलिए केवल sales देखकर नहीं, cost-per-order देखकर ad budget बढ़ाएँ।
एक Returned-to-Origin (RTO) order अलग नुकसान दे सकता है। मान लें COD parcel customer तक नहीं पहुँचा और वापस आया। Forward courier ₹45, return courier ₹45 और packaging ₹12 लगी, तो कम से कम ₹102 खर्च हुए; marketing और damage अलग होंगे। Product सही हालत में लौट आए तो वह inventory में वापस आ सकता है, लेकिन बिक्री का पैसा नहीं आया।
Minimum Price कैसे तय करें?
एक सरल planning formula है:
Minimum selling price = (Product + packaging + shipping + payment + expected return reserve + marketing cost) ÷ (1 − target contribution margin)
उदाहरण में ₹223 variable allocation और 20% target contribution margin मानें तो ₹223 ÷ 0.80 = ₹278.75 आता है।
करीब ₹279 से कम price पर उस लक्ष्य तक पहुँचना कठिन होगा। यह tax-inclusive legal pricing formula नहीं है; actual tax treatment अलग देखें।
एक normal order और एक return दोनों जोड़कर monthly summary बनाएं। product ad copy से creative messaging ठीक हो सकती है, लेकिन कोई prompt वास्तविक profit का स्थान नहीं ले सकता।
7-Day Product Validation Plan: Ads से पहले Test करें
यह सात दिन का learning framework है, बिक्री का वादा नहीं।
Goal है कि पहले सप्ताह के अंत में stock बढ़ाना चाहिए या नहीं, इस बारे में कुछ evidence मिले।
| दिन | क्या करें? | क्या रिकॉर्ड करें? |
|---|---|---|
| Day 1 | 10 products और competing offers shortlist | Price, material, size |
| Day 2 | 3 suppliers से written quotes माँगें | MOQ, invoice, replacement |
| Day 3 | Samples और safety/label checks | Defects, verified documents |
| Day 4 | Instagram profile, catalog और pricing | Final listing details |
| Day 5 | 2–3 real product demos पोस्ट करें | Enquiries, saves, genuine questions |
| Day 6 | Eligible leads को total price और delivery बताएँ | Confirmed orders, drop-offs |
| Day 7 | Cost, complaints और demand review करें | Continue, revise या stop |
दूसरे दिन supplier साफ जवाब न दे, तो calendar पूरा करने के लिए सामान खरीदना ज़रूरी नहीं है। Stage को रोककर supplier बदलना भी सही नतीजा है।
Day 7 पर यदि 25 enquiries आईं लेकिन केवल एक buyer ने पूरी कीमत और delivery confirm की, तो उस data से बड़े stock का फैसला नहीं निकलेगा।
Price objection, trust concern और shipping cost को अलग-अलग देखें।
अगर response अच्छा है, तो भी पहले limited batch deliver करके देखें। Repeat sales और low defect rate दिखने के बाद ही reorder quantity बढ़ाएँ।
अगले चरण में online store बनाने की guide उपयोगी हो सकती है, लेकिन यह पहले दिन की शर्त नहीं है।
नुकसान से बचाने वाले 6 Business Rules
| Risk | शुरुआत में बचाव |
|---|---|
| Unsold stock | Small batch और reorder trigger |
| Fake/unsafe toys | BIS licence और applicable compliance check |
| Low margin | Per-order landed cost sheet |
| COD returns | Address check और सीमित COD exposure |
| Damaged parcel | Packaging test और supplier replacement terms |
| Ads में पैसा डूबना | Small budget, measured conversion, stop rule |
Stop rule को पहले से लिखें। उदाहरण: लगातार सात दिन enquiry-to-order conversion कमजोर रहे और सुधार का स्पष्ट कारण न दिखे, तो ad spend रोककर listing, price और offer की समीक्षा करें। यह एक practical decision rule है, universal success formula नहीं।
अगर पहली 10 deliveries में कई complaints एक ही zipper या material की हों, तो अगला stock order करने से पहले defect का कारण निकालें।
Supplier का replacement promise लिखित में न हो तो future losses बढ़ सकते हैं।
इसी तरह ऐसे product की बड़ी quantity न लें जिसकी sale price केवल “दूसरे seller ₹299 ले रहे हैं” पर आधारित हो।
Customer के लिए सही value दिखाना और अपने खर्च cover करना, दोनों ज़रूरी हैं।
GST, Returns और Instagram Shop के बारे में क्या समझें?
क्या बिना website के शुरू कर सकते हैं?
Instagram content, DM और WhatsApp catalog के जरिए enquiries लेकर order manage किए जा सकते हैं। लेकिन payment, invoicing, applicable taxes और consumer obligations फिर भी लागू हो सकते हैं।
क्या GST registration हर seller को पहले दिन चाहिए?
इसका उत्तर turnover, राज्य, taxable/inter-state supply और किसी e-commerce operator के जरिए बिक्री के तरीके पर निर्भर करता है। CBIC की GST guidance पढ़ें और पहला interstate order या marketplace setup करने से पहले professional से अपना case confirm करें।
क्या toys पर BIS/ISI देखना ज़रूरी है?
Toys QCO के दायरे में आने वाले items पर लागू requirements पूरी होनी चाहिए। Supplier के licence और product marking को verify करें; “educational” लिखने से किसी toy को automatic exemption नहीं मिलती।
क्या customer को return policy बतानी चाहिए?
हाँ। Dispatch, delivery, damaged/wrong items, cancellation और refund का तरीका पहले स्पष्ट करें। Applicable consumer protection obligations के विपरीत कोई blanket “no refund” statement न लिखें। Consumer Protection E-Commerce Rules और अपने selling channel के नियम देखें।
क्या Instagram पर पैसे खर्च किए बिना शुरू हो सकता है?
Basic profile और organic content से testing शुरू हो सकती है। लेकिन samples, inventory, packaging, shipping और समय का खर्च होगा। Free promotion को zero-cost business न समझें।
Reusable Master Prompt: Product का Low-Risk Selling Plan बनाएं
जब आपके पास supplier quotation और product details हों, तब इस prompt से एक checklist बनवाएँ। AI को missing prices या demand अपने-आप invent करने के लिए न कहें।
आप small-business operations adviser की तरह काम करें। मेरे product के supplier quotation, market observations और available budget को देखकर practical validation plan बनाएँ। पहले missing information पूछें, फिर product safety और applicable labeling के risks बताएँ। Cost-per-order, return loss और minimum viable selling price की calculation करें। Instagram से enquiry लेने, WhatsApp पर order verify करने और small stock test की checklist दें। यदि कोई legal requirement अनिश्चित हो तो official source से verify करने को कहें। किसी wholesale rate, certification, conversion rate, sales figure या profit का अनुमान पक्के fact की तरह न लिखें। Output Hindi/Hinglish में स्पष्ट, numbered steps और एक small tracking table के साथ दें।
Product/category: [Pencil pouch / school kit / toy / other]
Target buyer: [Parents / guardians / teachers]
Supplier quoted cost and MOQ: [Verified quote]
Available starting budget: [Amount]
Product specifications and certification: [Verified details]
Target delivery area: [State/city/PIN codes]
Estimated shipping and packaging: [Quotes]
Intended selling channel: [Instagram DM / WhatsApp / own site]
Main concern: [Unsold stock / damage / returns / ads]
आप चाहें तो हर 7 दिन में इसी prompt में actual enquiries, deliveries और returns के numbers जोड़ें।
इससे अगली decision sheet अनुमान के बजाय अपने records पर आधारित होगी।
आख़िर में एक छोटी सी बात
Instagram पर बच्चों का सामान बेचना शुरू करने के लिए पहले बड़ी inventory बनाना ज़रूरी नहीं है। सही product, verified supplier, छोटा paid test और साफ order process अधिक मजबूत शुरुआत दे सकते हैं।
एक ही design की reel viral हो जाए तो खुशी होगी, लेकिन अगला purchase order actual delivered profit देखकर दें। यही फर्क एक आकर्षक business idea और टिकाऊ business process के बीच है।
आप किस बच्चों वाले product से शुरुआत करना चाहेंगे—school supplies, stationery combo या toys? नीचे comment में अपना idea और सबसे बड़ा concern लिखें, ताकि उसी आधार पर अगला practical guide तैयार किया जा सके।